Last updated
Customize pricing
Learn how to customize pricing in your marketplace by adding an optional helmet rental fee on top of the regular nightly price of the accommodation.
Table of Contents
- Store helmet rental fee into listing
- Save to public data
- Initialize the form
- Add input component
- Update BookingDatesForm
- Prepare props
- Add helmet rental fee checkbox
- Update the orderData
- Add a new line-item for the helmet fee
- Resolve the helmet rental fee
- Add line-item
- Update CheckoutPage to handle helmet rental fee
- Fetch speculated transaction complete with helmet rental fee
- Summary
In this tutorial, you will
- Allow providers to add a helmet rental fee to their listings
- Allow customers to select whether they want to include the helmet rental fee in their booking
- Include a selected helmet rental fee in the transaction's pricing
Information
This tutorial uses the following marketplace configurations:
- Listing types > Transaction process: Calendar booking
Store helmet rental fee into listing
Pricing can be based on a lot of variables, and one practical way to build it is to base it on information stored as extended data in listings. In this example, we are using a listing's public data to store information about the helmet rental fee.
We will not add new fields to listing configuration in Sharetribe Console, since we do not want to show the helmet rental fee in the Details panel. Instead, we start by making some changes to EditListingPricingPanel in EditListingWizard.
└── src
    └── containers
        └── EditListingPage
            └── EditListingWizard
                └── EditListingPricingPanel
└── EditListingPricingPanel.jsInformation
If you want to make corresponding changes to listing types with the transaction process Buying and selling products, you'll need to make comparable changes to EditListingPricingAndStockPanel.js instead.
Save to public data
In EditListingPricingPanel, we need to edit the onSubmit function to save the new public data field called helmetFee. Because we are using FieldCurrencyInput component in this example as the input of choice, the helmetFee variable will be a Money object when we get it from the submitted values. Money object can't be used directly as public data, so we need to create a JSON object with keys amount and currency, and use it in the underlying API call.
Information
The price attribute is one of the listing's default attributes, so it's passed to Marketplace API directly. The new public data attribute helmetFee, on the other hand, needs to be under the publicData key.
onSubmit={values => {
  const { price, helmetFee = null } = values;

  const updatedValues = {
    price,
    publicData: {
      helmetFee: helmetFee ? { amount: helmetFee.amount, currency: helmetFee.currency } : null,

    },
  };
  onSubmit(updatedValues);
}}
Initialize the form
Next, we want to pass inital values for price and helmetFee. For this, we need to get the helmetFee from listing attributes under the publicData key. Also, because FieldCurrencyInput expects the value to be a Money object, we need to convert the value we get from Marketplace API back to an instance of Money.
const getInitialValues = params => {
  const { listing } = params;
  const { price, publicData } = listing?.attributes || {};

  const helmetFee = publicData?.helmetFee || null;

  const helmetFeeAsMoney = helmetFee
    ? new Money(helmetFee.amount, helmetFee.currency)
    : null;

  return { price, helmetFee: helmetFeeAsMoney };
};
Now pass the whole initialValues map in the corresponding prop to
EditListingPricingForm.
Add input component
We want to be able to save the listing's helmet rental fee amount, so we add a new FieldCurrencyInput to the EditListingPricingForm. The id and name of this field will be helmetFee.
Adding this fee will be optional, so we don't want to add any validate param to the FieldCurrencyInput like there is in the price input.
└── src
    └── containers
        └── EditListingPage
            └── EditListingWizard
                └── EditListingPricingPanel
                    └── EditListingPricingForm.js
...
<FieldCurrencyInput
id={`${formId}price`}
name="price"
className={css.input}
autoFocus={autoFocus}
label={intl.formatMessage(
{ id: 'EditListingPricingForm.pricePerProduct' },
{ unitType }
)}
placeholder={intl.formatMessage({ id: 'EditListingPricingForm.priceInputPlaceholder' })}
currencyConfig={appSettings.getCurrencyFormatting(marketplaceCurrency)}
validate={priceValidators}
/>
<FieldCurrencyInput
id={`${formId}helmetFee`}
name="helmetFee"
className={css.input}
autoFocus={autoFocus}
label={intl.formatMessage(
{ id: 'EditListingPricingForm.helmetFee' },
{ unitType }
)}
placeholder={intl.formatMessage({ id: 'EditListingPricingForm.helmetFeePlaceholder' })}
currencyConfig={appSettings.getCurrencyFormatting(marketplaceCurrency)}
/>
...You can use the following marketplace text keys:
  "EditListingPricingForm.helmetFee":"Helmet rental fee (optional)",
  "EditListingPricingForm.helmetFeePlaceholder": "Add a helmet rental fee..."
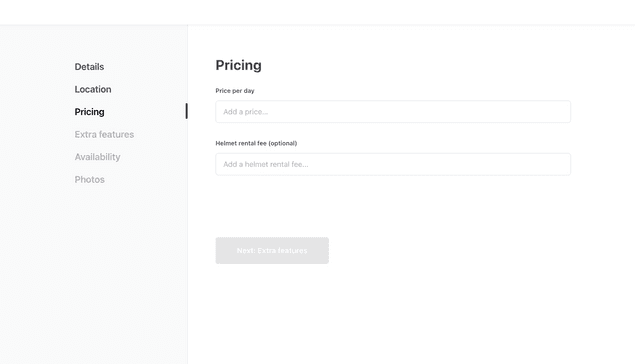
After adding the new marketplace text keys, the EditListingPricingPanel
should look something like this:
Update BookingDatesForm
In our example the helmet rental fee is optional, and users can select it as an add-on to their booking. In this section, we will add the UI component for selecting the helmet rental fee and pass the information about the user's choice to the the backend of our client app.
In case you want to add the helmet rental fee automatically to every booking, you don't need to add the UI component for selecting the helmet rental fee, and you can move forward to the next section: Add a new line item for the helmet rental fee.
Information
If you want to make corresponding changes to listing types with the transaction process Buying and selling products, you'll need to make comparable changes to ProductOrderForm instead of BookingDatesForm.
Prepare props
To use the information about helmet rental fee inside the BookingDatesForm, we need to pass some new information from OrderPanel to the form. OrderPanel is the component used on ListingPage and TransactionPage to show the order breakdown.
└── src
    └── components
        └── OrderPanel
            └── OrderPanel.js
OrderPanel gets listing as a prop. The helmet rental fee is now saved in the listing's public data, so we can find it under the publicData key in the listing's attributes.
Because adding a helmet rental fee to a listing is optional, we need to check whether or not the helmetFee exists in public data.
const helmetFee = listing?.attributes?.publicData.helmetFee;Once we have saved the helmet rental fee information to the variable helmetFee, we need to pass it forward to BookingDatesForm. This form is used for collecting the order data (e.g. booking dates), and values from this form will be used when creating the transaction line items. We will pass the helmetFee to this form as a new prop.
  <BookingDatesForm
    className={css.bookingForm}
    formId="OrderPanelBookingDatesForm"
    lineItemUnitType={lineItemUnitType}
    onSubmit={onSubmit}
    price={price}
    marketplaceCurrency={marketplaceCurrency}
    dayCountAvailableForBooking={dayCountAvailableForBooking}
    listingId={listing.id}
    isOwnListing={isOwnListing}
    monthlyTimeSlots={monthlyTimeSlots}
    onFetchTimeSlots={onFetchTimeSlots}
    timeZone={timeZone}
    marketplaceName={marketplaceName}
    onFetchTransactionLineItems={onFetchTransactionLineItems}
    lineItems={lineItems}
    fetchLineItemsInProgress={fetchLineItemsInProgress}
    fetchLineItemsError={fetchLineItemsError}
+   helmetFee={helmetFee}
  />
Add helmet rental fee checkbox
Next, we need to add a new field to BookingDatesForm for selecting the possible helmet rental fee. For this, we will use the FieldCheckbox component, because we want the helmet rental fee to be optional.
└── src
    └── components
        └── OrderPanel
            └── BookingDatesForm
                └── BookingDatesForm.js
                └── BookingDatesForm.module.css
In BookingDatesForm we need to import a couple of new resources we need to add the helmet rental fee. These will include a few helper functions necessary to handle the helmetFee price information, as well as the checkbox component FieldCheckbox.
  import { propTypes } from '../../util/types';
+ import { formatMoney } from '../../../util/currency';
+ import { types as sdkTypes } from '../../../util/sdkLoader';
  ...
import {
  Form,
  IconArrowHead,
  PrimaryButton,
  FieldDateRangeInput,
  H6,
+ FieldCheckbox,
} from '../../../components';

 import EstimatedCustomerBreakdownMaybe from './EstimatedCustomerBreakdownMaybe';

 import css from './BookingDatesForm.module.css';
+ const { Money } = sdkTypes;
When we have imported these files, we will add the checkbox component for selecting the helmet rental fee. For this, we need to extract the helmetFee from fieldRenderProps.
    ...
    lineItems,
    fetchLineItemsError,
    onFetchTimeSlots,
+   helmetFee,
  } = fieldRenderProps;
We want to show the amount of helmet rental fee to the user in the checkbox label, so we need to format helmetFee to a printable form. For this, we want to use the formatMoney function that uses localized formatting. This function expects a Money object as a parameter, so we need to do the conversion.
const formattedHelmetFee = helmetFee
  ? formatMoney(intl, new Money(helmetFee.amount, helmetFee.currency))
  : null;

const helmetFeeLabel = intl.formatMessage(
  { id: 'BookingDatesForm.helmetFeeLabel' },
  { fee: formattedHelmetFee }
);
We will also add a new marketplace text key BookingDatesForm.helmetFeeLabel to the en.json file or the Marketplace texts editor in Console, and we can use the fee variable to show the price.
"BookingDatesForm.helmetFeeLabel": "Helmet rental fee: {fee}",Because there might be listings without a helmet rental fee, we want to show the checkbox only when needed. This is why we will create the helmetFeeMaybe component which is rendered only if the listing has a helmet rental fee saved in its public data.
const helmetFeeMaybe = helmetFee ? (
  <FieldCheckbox
    className={css.helmetFeeContainer}
    id={`${formId}.helmetFee`}
    name="helmetFee"
    label={helmetFeeLabel}
    value="helmetFee"
  />
) : null;
Then we can add the helmetFeeMaybe to the returned <Form>
component
...
    isDayBlocked={isDayBlocked}
    isOutsideRange={isOutsideRange}
    isBlockedBetween={isBlockedBetween(monthlyTimeSlots, timeZone)}
    disabled={fetchLineItemsInProgress}
    onClose={event =>
      setCurrentMonth(getStartOf(event?.startDate ?? startOfToday, 'month', timeZone))
    }
  />

+ {helmetFeeMaybe}

  {showEstimatedBreakdown ? (
    <div className={css.priceBreakdownContainer}>
      <h3>
...
As the final step for adding the checkbox, add the corresponding CSS class to BookingDatesForm.module.css.
.helmetFeeContainer {
  margin-top: 24px;
}
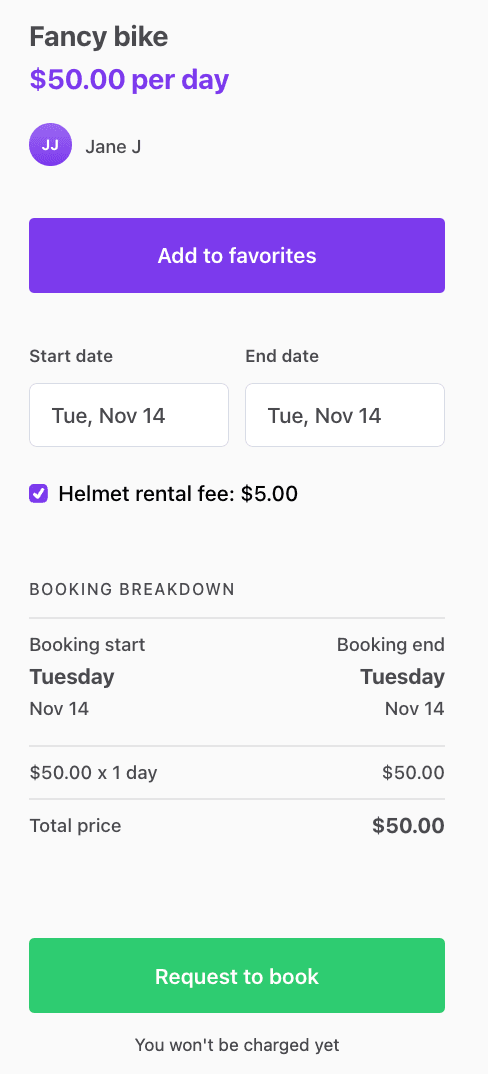
After this step, the BookingDatesForm should look like this. Note that the helmet rental fee will not be visible in the order breakdown yet, even though we added the new checkbox.
Update the orderData
Next, we want to pass the value of the helmet rental fee checkbox as part of the orderData. This is needed so that we can show the selected helmet rental fee as a new row in the order breakdown. To achieve this, we need to edit the handleOnChange function, which takes the values from the form and calls the onFetchTransactionLineItems function for constructing the transaction line items. These line items are then shown inside the bookingInfoMaybe component under the form fields.
Information
In Sharetribe, the total price of a transaction is defined by its line items. Line items describe what is included in a transaction. Line items can be varied, from the number of booked units to customer and provider commissions, add-ons, discounts, or payment refunds.
Every line item has a unit price and one of the following attributes: quantity, percentage, or both seats and units. The quantity attribute can be used to denote the number of booked units, like the number of booked nights. Quantity can also be defined as a multiplication of units and seats. The percentage param is used, for instance, when modeling commissions. Based on these attributes, a line total is calculated for each line item. Line totals then define the total payin and payout sums of the transaction.
You can read more about line items and pricing in the pricing concepts article.
In the orderData object, we have all the information about the user's choices. In this case, this includes booking dates, and whether or not they selected the helmet rental fee.
We only need to know if the helmet rental fee was selected. We will fetch the helmet rental fee details from Marketplace API later in the the backend of our client app to make sure this information cannot be manipulated.
In our case, because there is just one checkbox, it's enough to check the length of that array to determine if any items are selected. If the length of the helmetFee array inside values is bigger than 0, the hasHelmetFee param is true, and otherwise it is false. If we had more than one item in the checkbox group, we should check which items were selected.
const handleFormSpyChange = (
  listingId,
  isOwnListing,
  fetchLineItemsInProgress,
  onFetchTransactionLineItems
) => formValues => {
  const { startDate, endDate } =
    formValues.values && formValues.values.bookingDates
      ? formValues.values.bookingDates
      : {};

  const hasHelmetFee = formValues.values?.helmetFee?.length > 0;

  if (startDate && endDate && !fetchLineItemsInProgress) {
    onFetchTransactionLineItems({
      orderData: {
        bookingStart: startDate,
        bookingEnd: endDate,
        hasHelmetFee,
      },
      listingId,
      isOwnListing,
    });
  }
};
Add a new line-item for the helmet fee
We are making progress! Next, we need to edit the the backend of our client app, and add a new line item for the helmet rental fee, so that it can be included in pricing.
Sharetribe uses privileged transitions to ensure that the pricing logic is handled in a secure environment. This means that constructing line items and transitioning requests of privileged transitions are made server-side.
Information
Privileged transitions are transaction process transitions that can only be invoked from a secure context. For example, when using Sharetribe Web Template, this secure context is the backend of the template app. You can also build your own server-side validation that sits between your marketplace UI and the Sharetribe Marketplace API to invoke privileged transitions.
We are using privileged transitions and the backend of our client app to construct line items, because we want to make sure it is done in a secure context. If the client-side code (template front-end) could freely construct the line items, we couldn't fully trust that the price calculation follows the model intended in the marketplace.
In theory, a marketplace user could make a direct API call to the Sharetribe Marketplace API and start a transaction with modified line items – for instance, change the helmet rental fee amount. We can avoid this security risk by using privileged transitions and fetching the pricing information, like the helmet rental fee amount, directly from Marketplace API in the backend of our client app.
You can read more about privileged transitions in the privileged transitions concepts article.
Since we want to add a new line item for the helmet rental fee, we'll need to update the pricing logic in the lineItems.js file:
└── server
    └── api-util
        ├── lineItems.js
        └── lineItemHelpers.js
Resolve the helmet rental fee
First, we will add a new helper function for resolving the helmet rental fee line item. This function will take the listing as a parameter, and then get the helmet rental fee from its public data. To make sure the data cannot be manipulated, we don't pass it directly from the template frontend. Instead, we fetch the listing from Marketplace API, and check that listing's public data for the accurate helmet rental fee.
If you have several helper functions, you might want to export this
function from the lineItemHelpers.js file instead, and import it in
lineItems.js.
const resolveHelmetFeePrice = listing => {
  const publicData = listing.attributes.publicData;
  const helmetFee = publicData && publicData.helmetFee;
  const { amount, currency } = helmetFee;

  if (amount && currency) {
    return new Money(amount, currency);
  }

  return null;
};
Add line-item
Now the transactionLineItems function can be updated to also provide the helmet rental fee line item when the listing has a helmet rental fee.
In this example, the provider commission is calculated from the total of booking and helmet rental fees. That's why we need to add the helmetFee item also to calculateTotalFromLineItems(...) function in the providerCommission line item. If we don't add the helmet rental fee, the provider commission calculation is only based on the booking fee.
Also remember to add the helmet rental fee to the lineItems array that is returned in the end of the function.
exports.transactionLineItems = (listing, orderData) => {
...

  const order = {
    code,
    unitPrice,
    quantity,
    includeFor: ['customer', 'provider'],
  };

+ const helmetFeePrice = orderData.hasHelmetFee ? resolveHelmetFeePrice(listing) : null;
+ const helmetFee = helmetFeePrice
+   ? [
+       {
+         code: 'line-item/helmet-rental-fee',
+         unitPrice: helmetFeePrice,
+         quantity: 1,
+         includeFor: ['customer', 'provider'],
+       },
+     ]
+   : [];
+

  // Provider commission reduces the amount of money that is paid out to provider.
  // Therefore, the provider commission line-item should have negative effect to the payout total.
  const getNegation = percentage => {
    return -1 * percentage;
  };

  // Note: extraLineItems for product selling (aka shipping fee)
  //       is not included to commission calculation.
  const providerCommissionMaybe = hasCommissionPercentage(providerCommission)
    ? [
        {
          code: 'line-item/provider-commission',
-         unitPrice: calculateTotalFromLineItems([order]),
+         unitPrice: calculateTotalFromLineItems([order, ...helmetFee]),
          percentage: getNegation(providerCommission.percentage),
          includeFor: ['provider'],
        },
      ]
    : [];

  // Let's keep the base price (order) as first line item and provider's commission as last one.
  // Note: the order matters only if OrderBreakdown component doesn't recognize line-item.
- const lineItems = [order, ...extraLineItems, ...providerCommissionMaybe];
+ const lineItems = [order, ...extraLineItems, ...helmetFee, ...providerCommissionMaybe];


  return lineItems;
};
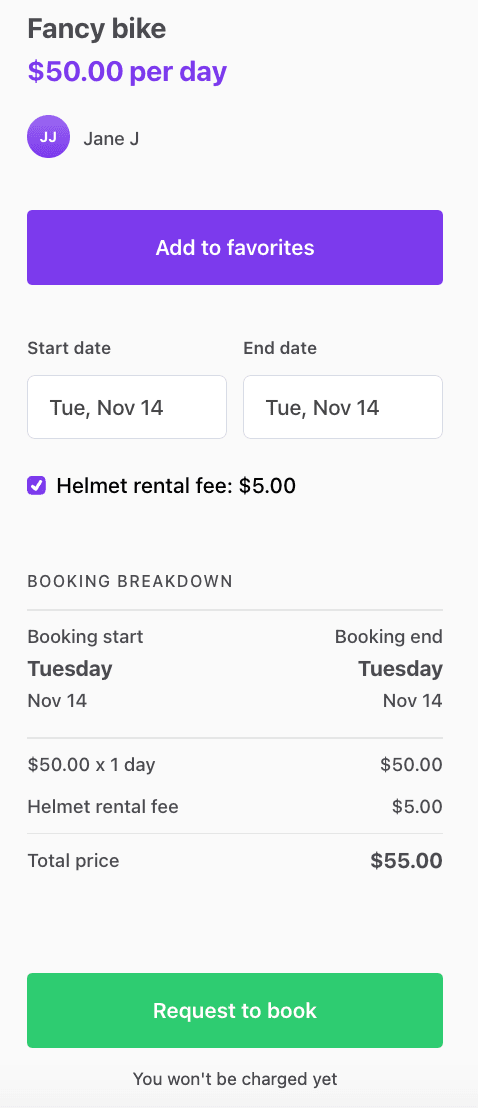
Once we have made the changes to the backend of our client app, we can check the order breakdown again. If you now choose the helmet rental fee, you should see the helmet rental fee in the booking breakdown:
Update CheckoutPage to handle helmet rental fee
Finally, we want to update the Checkout Page so that it takes the helmet rental fee selection into account when the customer actually pays for the booking.
Fetch speculated transaction complete with helmet rental fee
When a user clicks "Request to book", ListingPage.js sends the booking
details as initial values to the Checkout Page, which then fetches the
possible transaction information, including pricing, to be shown on the
checkout page. In Sharetribe language, this is known as "speculating"
the transaction - the booking has not been made, but the line items are
calculated as if it were.
Since we are dealing with a paid transaction, we need to be modifying
the CheckoutPageWithPayment.js component. In that file, we have a
function called getOrderParams, which creates the correct set of order
parameters for all line item related API calls. Let's add helmet rental
fee handling to that function.
└── src
    └── containers
        └── CheckoutPage
            └── CheckoutPageWithPayment.js
const getOrderParams = (pageData, shippingDetails, optionalPaymentParams, config) => {
const quantity = pageData.orderData?.quantity;
const quantityMaybe = quantity ? { quantity } : {};
const deliveryMethod = pageData.orderData?.deliveryMethod;
const deliveryMethodMaybe = deliveryMethod ? { deliveryMethod } : {};
+ const hasHelmetFee = pageData.orderData?.helmetFee?.length > 0;
const { listingType, unitType } = pageData?.listing?.attributes?.publicData || {};
const protectedDataMaybe = {
protectedData: {
...getTransactionTypeData(listingType, unitType, config),
...deliveryMethodMaybe,
...shippingDetails,
},
};
// These are the order parameters for the first payment-related transition
// which is either initiate-transition or initiate-transition-after-enquiry
const orderParams = {
listingId: pageData?.listing?.id,
...deliveryMethodMaybe,
+ hasHelmetFee,
...quantityMaybe,
...bookingDatesMaybe(pageData.orderData?.bookingDates),
...protectedDataMaybe,
...optionalPaymentParams,
};
return orderParams;
};This function is used to build order parameters when the component loads
initial data for the page, and the order parameters are then passed to a
speculateTransaction action in CheckoutPage.duck.js. That action, in
turn, calls the template server using the correct endpoint and the order
parameters provided.
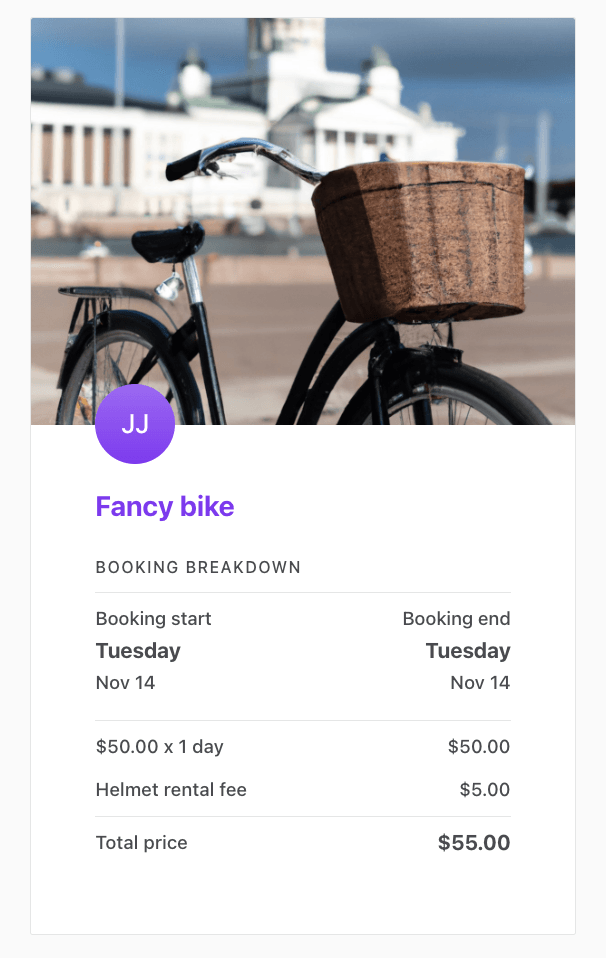
Now when the customer selects helmet rental fee on the listing page and clicks "Request to book", we see the correct price and breakdown on the checkout page.
The same function builds order parameters that get passed to the final transaction initialisation.
Information
In CheckoutPageWithPayment.js, the function that does the heavy
lifting in handling the payment processing is
processCheckoutWithPayment(), which is imported from a helper file. In
short, it first creates five functions to handle the transaction payment
process, then composes them into a single function
handlePaymentIntentCreation(), and then calls that function with the
orderParams parameter.
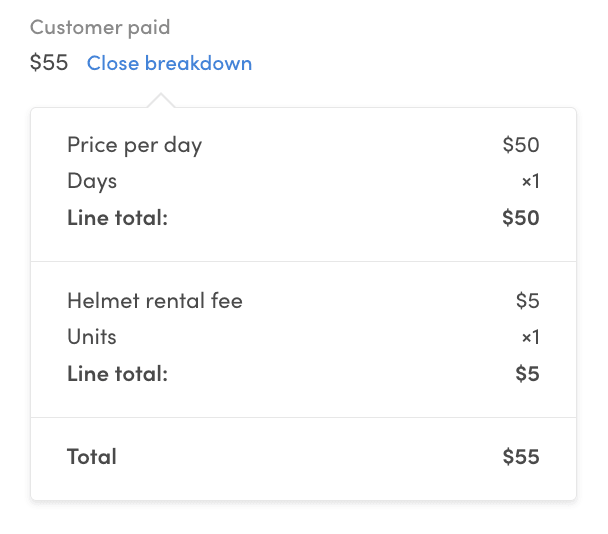
Now you can try it out! When you complete a booking on a listing that has a helmet rental fee specified, you can see the helmet rental fee included in the price on the booking page. In addition, the Sharetribe Console transaction price breakdown also shows the helmet rental fee.
...
-       {{/if}}{{/eq}}{{#eq "line-item/provider-commission" code}}
+       {{/if}}{{/eq}}
+       {{#eq "line-item/helmet-rental-fee" code}}
+       <table align="center" border="0" cellPadding="0" cellSpacing="0" role="presentation" width="100%">
+         <tbody>
+           <tr>
+             <td>
+               <td>
+                 <p style="font-size:16px;line-height:1.4;margin:16px 0;color:#484848;margin-top:1px">Helmet rental fee</p>
+               </td>
+               <td style="text-align:right">
+                 <p style="font-size:16px;line-height:1.4;margin:16px 0;color:#484848;margin-top:1px">{{> format-money money=line-total}}</p>
+               </td>
+             </td>
+           </tr>
+         </tbody>
+       </table>
+       {{/eq}}
+       {{#eq "line-item/provider-commission" code}}
        <table align="center" border="0" cellPadding="0" cellSpacing="0" role="presentation" width="100%">
...
The email templates that list the full line items in the default booking process are
booking-new-request(to provider)booking-request-accepted(to customer)booking-money-paid(to provider)
Summary
In this tutorial, you have
- Saved a helmet rental fee attribute to the listing's public data in EditListingPricingPanel
- Updated the BookingDatesForm and OrderPanel to show and handle helmet rental fee selection
- Added helmet rental fee to line item handling server-side
- Updated the CheckoutPage to include helmet rental fee in the booking's pricing